I was thinking about the cookie exchanges and how it would have been 12 years of hosting it last Christmas. I thought about us gathering together in the kitchen and sharing our recipes and stories like we have in the past. We skipped the last 2 years as we were under lock down and had a quieter than usual Christmas with a lot less cookies.
In the meantime, it is fun to look back at some of the past ones!
My cameraman (AKA Dan) creates a fun picture based on a Christmas movie for the invitation. The one above is from 2019.
I usually have the swap on the weekend of the 15th or 16th and Dan would meet up with some of the guys and go to brunch at Murphy's Law around the corner. (they have a Caesar buffet)
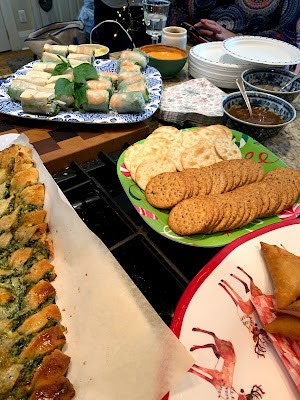
I have been serving basically the same thing year after year. Cool spring rolls from Mimi's that Leslie often picks up for me, although Jim has picked them up too. Thank you Jim!!!!! Samosas from the Sultan of Samosas, veggie tray, cheeses and bevies.
The last year we had it, Chris brought everyone a jar of her cranberry chutney which my family and friends devoured at Christmas.
I have invited the same friends year after year and try to keep it small (about 12-13 people) The reason I keep it small is so we don't have to bake more than seven dozen (of the same cookie = 84 cookies divided by 13 friends give us each about 6-7 cookies of each type) and we each leave with 7 dozen of a variety of cookies. If there are more bakers and baked the same 7 dozen we would leave with seven dozen but less of the same cookie and I think 6-7 of the same cookie is about what we want.
I try to get everyone to tell me their recipe, but that hasn't worked out very well ...busy lives etc.
We try not to have store bought cookies but with some of our busy schedules that hasn't always worked out either. We do say that if you are going to buy them, they must be from a local bakery and look like a home made cookie. There is no question, that we really would prefer everyone to make their cookies, no matter what they look like, because we know they were baked ...from the heart.
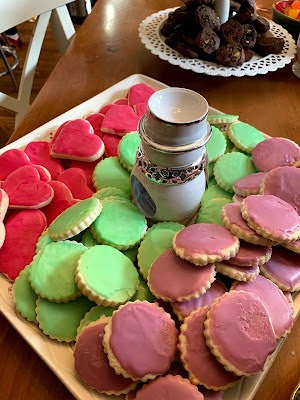
It is quite exciting when everyone comes in with their containers and starts laying out their cookies...they look so beautiful.
We go around the room and everyone gets to talk about their cookies and usually some disasters surface. I remember the day we found out that Brenda's ginger snap cookies were not ginger snap cookies at all.
We all talked about how we wait each year for Brenda's ginger snap cookies. How I remember Savannah, Lori's daughter and Liam, Lisa's son barely tall enough to see over the table and staring wide eyed at the ginger snap cookies that Brenda baked. We wouldn't let them touch the cookies until the swap began!, Then she finally had to break it to us that it was a molasses cookie...we were all shocked and laughed.
And then there was the year that Brenda was busy and in walked her husband Pat (Macdonald) with the cookies....our special guest! Those who know him can imagine the laughs we had that year.
And then there was Brent, who made the cookies that year for Elaine because she was away until the last minute. He actually made a video demonstrating himself making the cookies - like the star on a cookie channel ...hilarious!
Meredith's mom, Myfanwy who always parks so many blocks away because she doesn't love driving around here, has been coming each year. Surprise surprise - she parked close to the house the last time! She comes in laden with cookies and also decorations for her platter!. Myfanwy and Meredith have been coming since the beginning and we love to always hear the stories of the boys with their cookies and of course the year Meredith's oven didn't work and she had to come up with a non- bake cookie.

Lisa sometimes flies in just in time to get the cookies on the table but she missed it the last time... Travelling....wow that is a strange word! There is Mary Lou who hasn't missed until the last year (because she was sick) and who I can depend on to help me tidy things up and remind me to take things out of the oven!
And then there is Leslie who usually wants to bake something different and more complicated. She baked the most beautiful Florentines one year and then there are her chocolate covered cherries.
There was the year that Chris showed up at the door, with her wooden Sleigh platter, (she always displays her cookies on the sleigh so they look so pretty) and she forgot what time the cookie swap started and we had already finished and everyone was leaving! Chris makes some great cookies but really stresses out about her baking for this exchange. Her cookies are always great!
Karen always has very pretty cookies that everyone appreciates, usually decorated in beautiful colors.
Caley, has also been coming for the last few years. She showed up last time with half the amount of cookies needed. I can bug her at work about forgetting the amount of cookies LOL...How many cookies???? I have to thank her and Brenda for keeping Wally under control:)
Our 2 new guests this year were Dianne and Lynda who both made fantastic cookies...Sadly Lynda lost her fight to cancer this past year. She left us with her family shortbread recipe which we will make in our future cookie swaps in her memory.
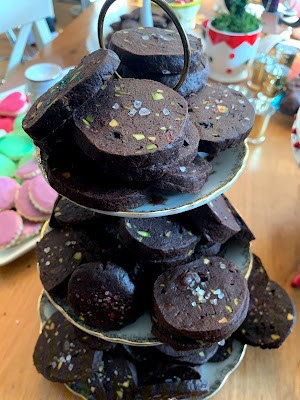
Sometimes I want to try different cookies but I am drawn back to my usual ones. How could I not make my Mayan chocolate sparklers. When Ben, Chris' son was visiting, he asked if I would be having the cookie exchange this year. He told me how he loved when his mom came home with all the different cookies and would I be making my Chocolate Mayan cookies because he loved them.
I have watched this little guy grow up and so thrilled by the handsome wonderful guy he has become!
The last year I changed my cookies ( Linzer) and actually felt bad that
I did...I wanted to try something else but I like tradition and next
year I am back to the Mayan sparklers and cranberry pistachio
shortbread!
So at the end of the day, it really isn't all about the cookies but more about the tradition and getting together with some friends, sharing stories, laughing together and connecting at least one time a year for a few hours. I really look forward to it every year and hope it continues for many years to come.This year showed me how much I missed the cookie exchange...the cookies...but mostly my friends...looking forward to the day when we can be together in the kitchen again, sharing stories and laughing and maybe even hugging... I miss you guys...
Until we bake again
Penny
xxx