When the
Daring Bakers challenge of Tuiles was announced this month it brought back memories of my trip to Provence. Tuiles are the very thin, crisp, light cookies that resemble the curved French roofing tiles for which they are named..and they are perfect with creamy strawberry ice cream...yum.
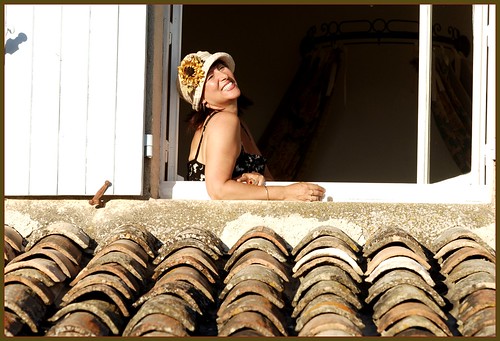
Last June, Dan and I rented an apartment in a renovated farmhouse,
Ferme de la Platane, just on the outskirts of the village of Ansouis, surrounded by vineyards in the Cote de Luberon. Rosemary and Peter, the owners, were wonderful hosts and were always so helpful with recommendations for things to do and places to eat. It was sooooo beautiful...we visited the markets and explored this beautiful part of France. Here is a picture of me in our bedroom window that Dan took from the vineyard across the road. See the tuiles of the roof...
This month's challenge is brought to us by Karen of
Bake My Day and Zorra of
1x umruehren bitte aka Kochtopf. They have chosen Tuiles from The Chocolate Book by Angélique Schmeink and Nougatine and Chocolate Tuiles from Michel Roux.
The recipe is easy but the technique is a little challenging. Traditionally you mold the warm cookies over a rolling pin or arched form, like I did, but you can create different shapes like butterflies or mini cups to hold sorbet or ice cream.
Recipe:Yields:10 tuiles
Preparation time for batter 10 minutes, waiting time 30 minutes, baking time: 5-10 minutes per batch
65 grams / ¼ cup / 2.3 ounces softened butter (not melted but soft)
60 grams / ½ cup / 2.1 ounces sifted confectioner’s sugar
1 sachet vanilla sugar (7 grams or substitute with a dash of vanilla extract)
2 large egg whites (slightly whisked with a fork)
65 grams / 1/2 cup / 2.1/4 ounces sifted all purpose flour
1 tablespoon cocoa powder/or food coloring of choice ( I used a tiny drop of red coloring for my dots)
Butter/spray to grease baking sheet
Oven 350F
Using a hand whisk or a stand mixer fitted with the paddle (low speed)- cream butter, sugar and vanilla to a paste.
Keep stirring while you gradually add the egg whites.
Continue to add the flour in small batches and stir to achieve a homogeneous and smooth batter/paste. Be careful not to over mix.
Cover the bowl with plastic wrap and chill in the fridge for at least 30 minutes to firm up. (This batter will keep in the fridge for up to a week - take it out 30 minutes before you plan to use it)
Line a baking sheet with parchment paper or grease with either butter/spray.
Mix a small part of the batter with the cocoa or food coloring and a few drops of warm water until evenly colored.
Spread batter on parchment in desired shapes or simple rounds, ovals etc. - thinly spread. You can also transfer the batter into a piping bag fitted with a small plain tip and pipe the desired shapes.
Place the colored batter in a paper piping bag and pipe decorations on the cookie before baking
Bake cookies in a preheated oven (350F) for about 5-10 minutes or until the edges turn golden brown. Watch them!
Immediately release from the baking sheet and proceed to shape/bend the cookies in the desired shape using : a rolling pin, a broom handle, cups, cones….
Note: These cookies have to be shaped while still warm so you might want to bake a small amount at a time.
...Now for the Creamy Strawberry Ice Cream

Makes 10 - ½ cup servings (adapted from the Cuisinart instruction & recipe book)
· 1 pint fresh ripe strawberries, stemmed and sliced
· 3 Tablespoons freshly squeezed lemon juice
· 1 cup sugar (divided in half)
· 1 cup whole milk
· 2 cups heavy cream
· 1 teaspoon pure vanilla extract
1. In a small bowl, combine the strawberries with the lemon juice and ½ cup of the sugar. Stir gently and allow the strawberries to macerate in the juices for 2 hours. Strain the berries, reserving juices. Mash or puree half the berries.
2. In a medium mixing bowl on low speed, combine the milk and remaining ½ cup sugar until the sugar is dissolved, about 1 to 2 minutes. Stir in the heavy cream, reserved strawberry juice, mashed strawberries and vanilla.
3. Pour the mixture into the ice cream maker and let mix until thickened, about 20-25 minutes. Five minutes before mixing is completed, add the reserved sliced strawberries and let mix in completely.
The ice cream will have a soft, creamy texture. If you would like it firmer, transfer it to an airtight container and place in the freezer for about 2 hours. Remove from the freezer about 10 minutes before serving.
Just delicious!
Until we bake again...
Penny


6 comments:
Awesome photos!
Those are absolutely lovely. Well done!
Lovely presentation and the strawbery ice cream is something I must try! Very nice job!
Very clever the shoot of you and the tiles. What a lovely picture of the tuile and the blue glass container. Your combination is so fab and must be a treat to eat. Good job on this challenge. Love the idea that you are in French and doing tuiles!!
Love how you paired the delicate tuiles with the strawberry ice cream. They compliment each other and are color-coordinated!
Great Photos! Love the combination as well! I would like to invite you to Foodista.com - the cooking encyclopedia everyone can edit. We have lots of easy recipes you can try, so do check us out. Would also love a link to this post from our site.(This will direct Foodista readers to your blog)Here's how you can create inbound links from our site Check it out here.
Post a Comment